Entries tagged [conversion]
Conversion Spotlight: Epirian Mule Cargo Drone
Posted on Monday Jan 23, 2017 at 05:00pm in Models
 - by Iain Wilson
A lot of Epirian tech was originally developed for industrial or agricultural purposes and later modified and adapted for a military role. The Hunter warmech, however, was specifically designed for warfare. I thought it would be fun to see what might happen if the Hunter chassis was retrofitted back to more benign uses, and from that the Mule cargo drone was born.
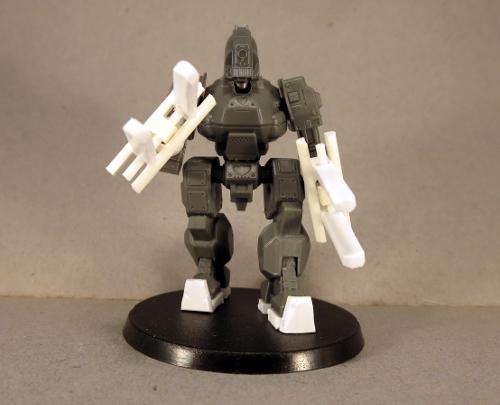
One of the obvious changes is the removal of the integrated processor unit and replacement with a head formed from the core unit of a standard drone. This was intended to reflect the civilian adaptation of the robot, with the more advanced processor unit swapped out for a less robust, less advanced (and likely much cheaper) alternative. I envisage the Mule as being much less autonomous than the Hunter and more limited in function.
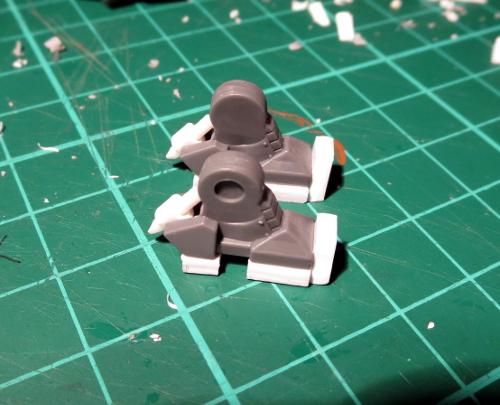
Adding a head ran the risk of making the rest of the robot look a little stumpy by comparison to the regular Hunter, and so I started out by bulking up the feet to give the legs the appearance of extra length.
This was done by adding some platforms under the heel and toe of each foot, and adding a kickplate on the front to help tie these into the shape of the foot. I also added some spikes to the heels, which I imagine being rammed into the ground and used to stabilise the robot when it is lifting something tricky.
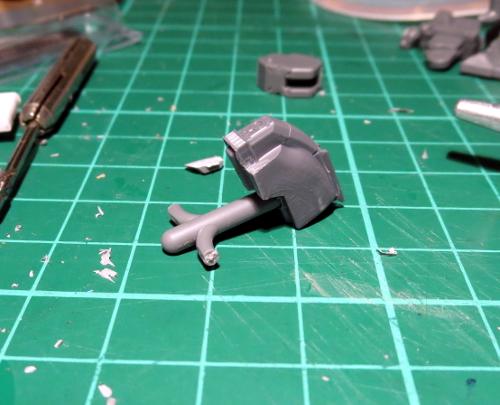
For the head, I carefully removed the Hunter's original head unit with an exacto knife.
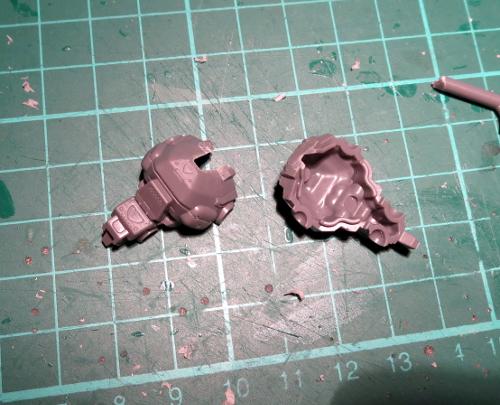
I then trimmed up a T-shaped piece cut from one of the Hunter's sprues to form the neck. This sits nicely inside the front of the torso.
Taking a drone, I cut off all of the extraneous bits, leaving just the central unit. The hole in the bottom for the Firefly flight stem was widened to the width of the neck shaft, and this was then glued in place.
At this point, the legs and torso were all assembled as normal.
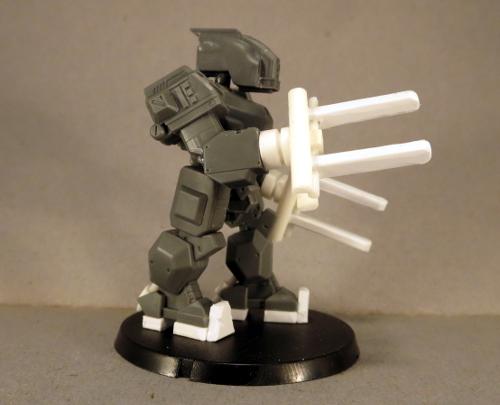
A cargo drone needs lifty arms (yes, that's the offical terminology), and so I took two forearm pieces and cut them off flat on the 'wrist' ends.
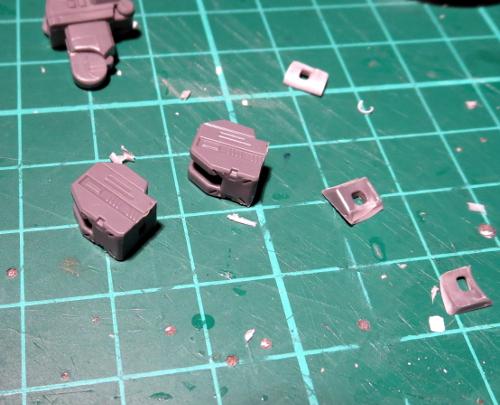
Note: You only get one of these forearm pieces on the Hunter sprue. If you have built another Hunter with a ranged weapon on the left arm instead of the hand, you'll have a forearm piece left over just waiting to be used for something like this.
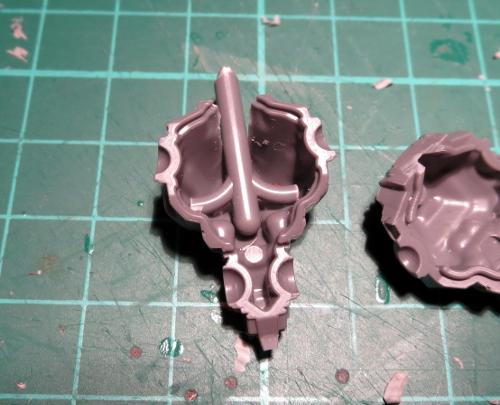
The parts for the forks were then cut from plasticard and glued together.
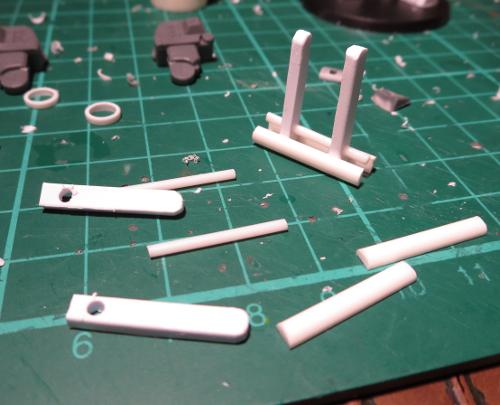
Once the glue on the forks was set they were attached to the forearms with plastic tubing, to create an assembly that looks capable of rotating, for fine control when toting those bales.

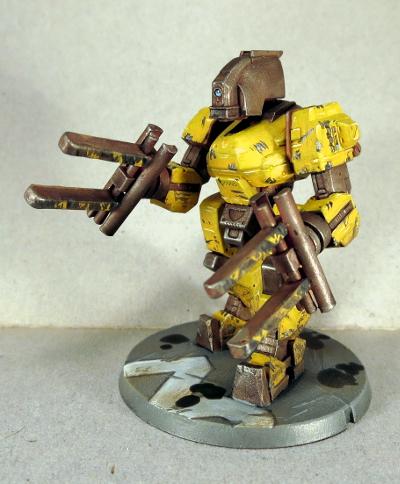
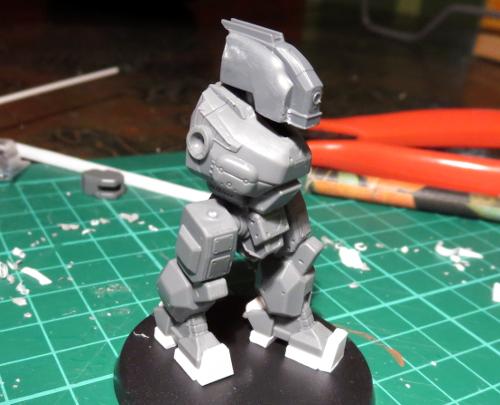
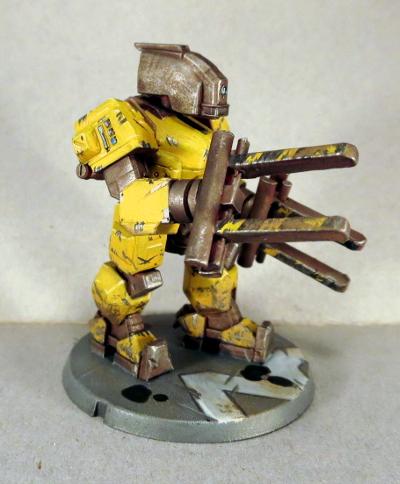
With the arms then glued in place, the Mule looks something like this:
All that's left to do then, of course, is to paint it.
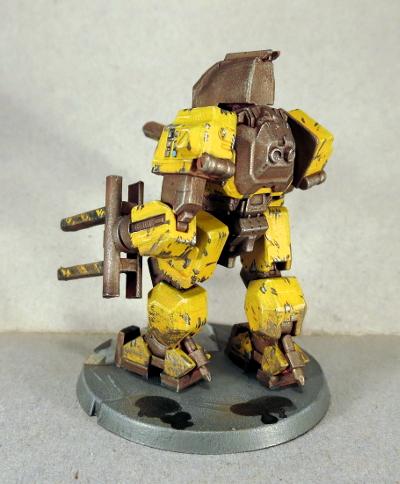
A nice, bright, construction-site yellow was the only possible choice for painting my walking forklift. Metal parts were painted to be battered and weathered, and I added generous amounts of chipping and scratches to the yellow to show that this is a piece of hard-working machinery.
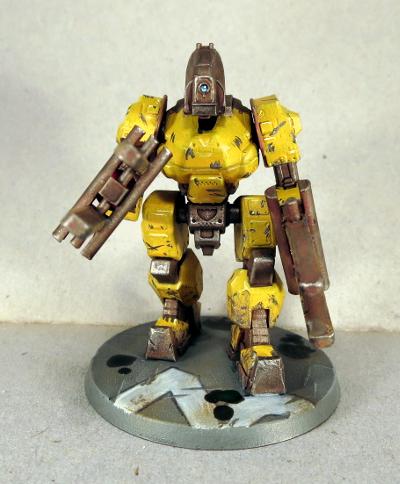
Game-wise, I picture this robot as an upgrade to a Spider drone unit, with minimal combat functionality but the ability to strip Victory Points from objectives at a more rapid rate than normal. It would also be fun to develop the design further and come up with other variants - perhaps a mining drone, an emergency response drone, or a construction unit.
Do you have ideas for your own drone variants? Grab some robot sprues from the Maelstrom's Edge webstore and see what you can come up with! And as always, feel free to share your creations on the Comm Guild Facebook page!
Tags: conversion drone epirian hunter
Epirian Warden Conversion Tutorial and Unit Card
Posted on Monday Dec 12, 2016 at 05:00pm in Models
- by Iain Wilson
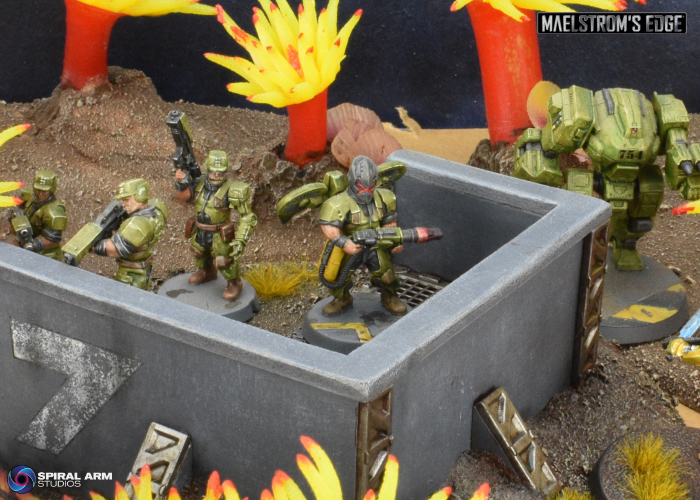
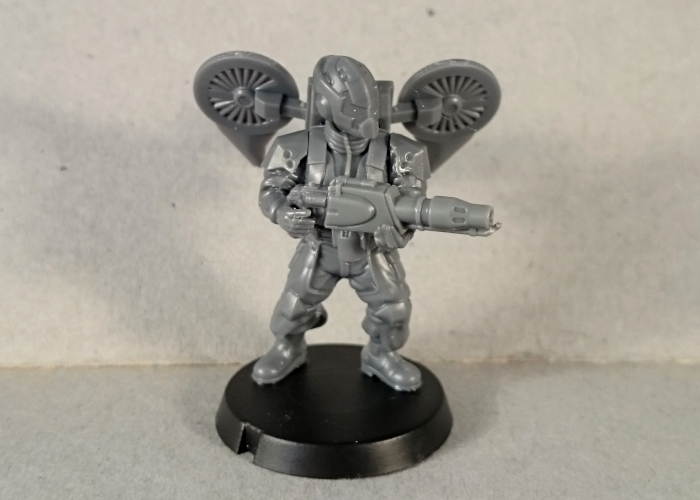
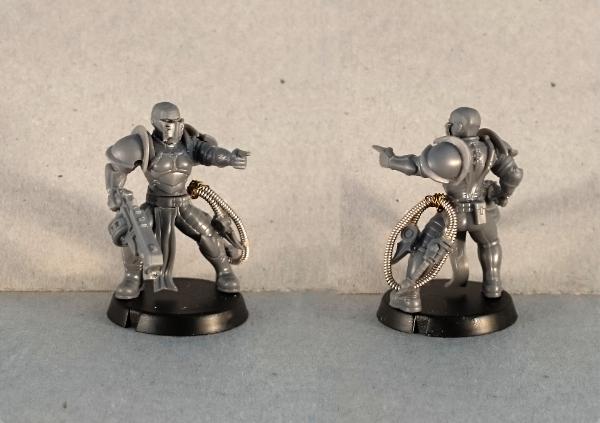
In amongst my early tinkering with the miniatures released for Maelstrom's Edge, I came up with a concept for an Epirian 'Warden' - a jump-pack-equipped solo character armed with a flame thrower, built rather handily using leftover parts from the Scarecrow and Drone sprues. He proved rather popular, so I've put together a tutorial showing how to build one for yourself.
The original conversion:
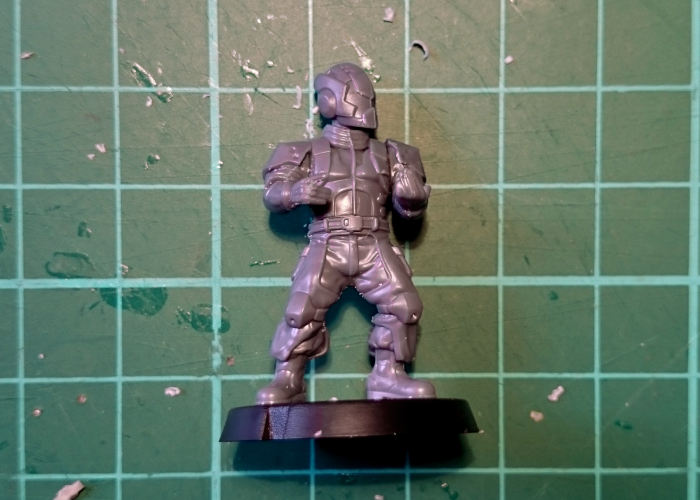
Building the Warden
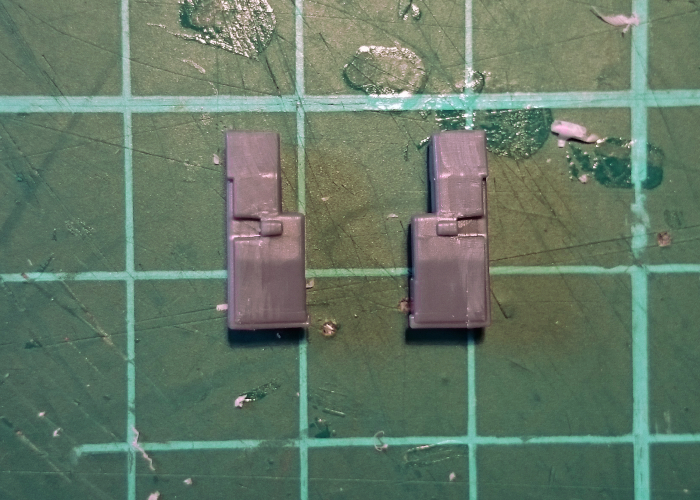
The original version requires a length of guitar string (or similar sized wire) for the flamethrower's fuel line and some pinning to hold the flight rotors in place. In order to keep things easier for beginners, I fine-tuned the design a little, replacing the separate tanks and fuel line with an integrated fuel canister, and slightly changing the way the jump pack goes together.
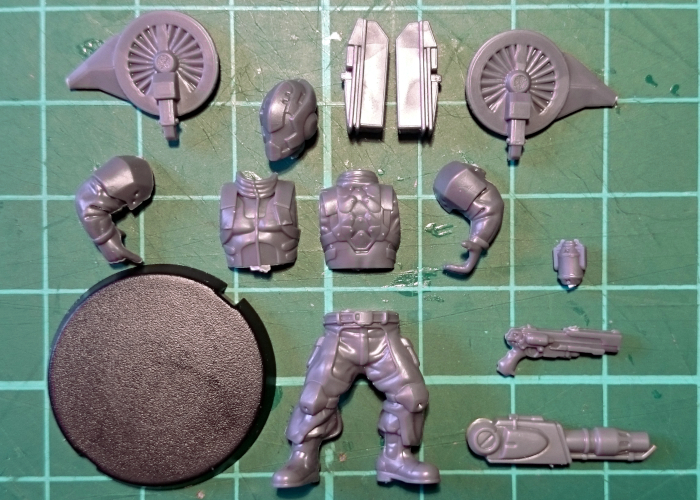
To build this version yourself, you'll need the following parts:
- A 25mm base
- Contractor or Bot Handler legs
- A Contractor torso and rifle arms (in this tutorial I have used the sleeved arms from the Faction Expansion sprue)
- A Bot Handler helmet
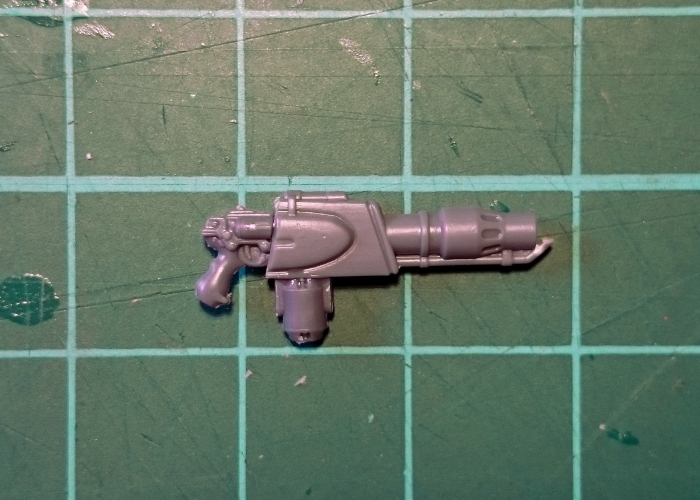
- A Maglock Pistol from the Contractor sprue
- A Clingfire Sprayer from the Scarecrow sprue
- A Choke Grenade (part F) from the Faction Expansion sprue
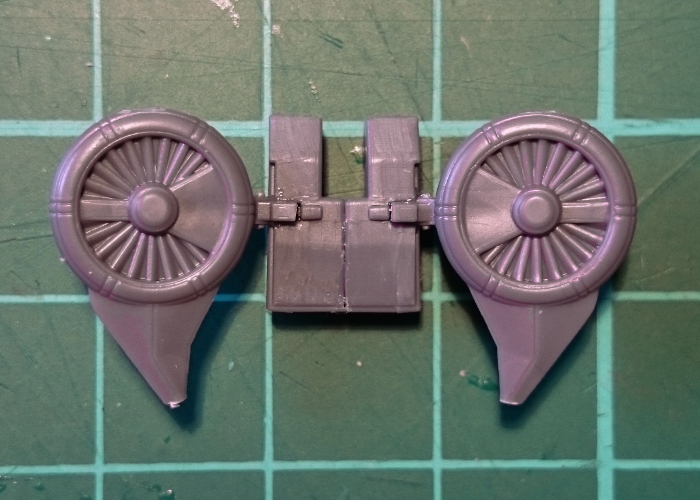
- Two rotors and the Drone side parts they connect to from the Drone sprue

You can pick up the parts you need to build your own Warden from the Maelstrom's Edge online store (www.maelstromsedge.com - You'll need the Epirian Contractor, Handler, Scarecrow, Drone and Faction Expansion Sprues, although if you already have those units (and went with Spider drones instead of Fireflies) you can probably build the Warden from your leftover parts.
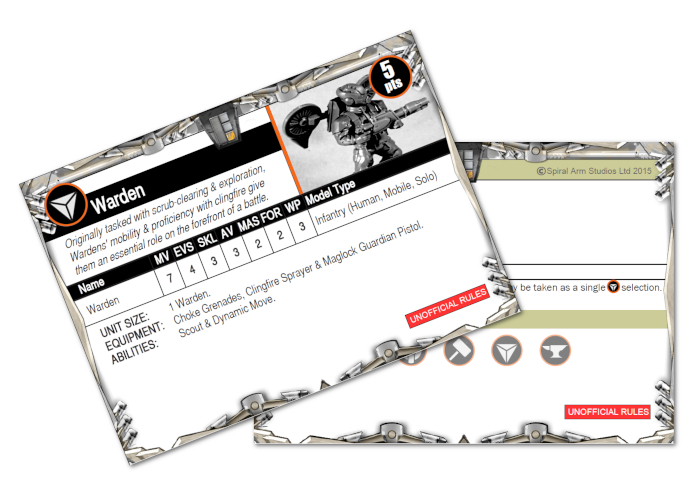
Updated 15th Nov 2022 - If you're interested in using the Warden in your games, you can find a rules page in the Maelstrom's Edge V2 Beta Rules section here, or a custom unit card for V1 in the 'Unofficial Cards - All Factions' document found here. This unit isn't an 'official' release for the game from the design studio, just something fun that I put together myself. So if you're planning on using him in your force, be sure to run it past your opponent first.
Tags: conversion epirian tutorial
Angel Keeper Conversion Tutorial and Rules
Posted on Tuesday Nov 15, 2016 at 05:00pm in Models
- by Iain Wilson
I've previously shown off a couple of conversions built to represent Karist Angel Keepers - a HQ unit that is currently in development and intended to offer a different way of playing Karist forces, by giving them access to an army potentially made entirely (other than the Keeper, of course) out of Angels. The conversions garnered a fair amount of interest, so I thought I should put together a brief run-down on how to do it. Of course, nice conversions are all well and good, but you also need rules to use them. So as an extra bonus, I snuck into the rules development vault and purloined an early playtest version of the Angel Keeper's unit card, which you can download as a PDF here.
Note: This card is now out of date. The current version of the Angel Keeper's rules can be found in the Karist Enclave file here.
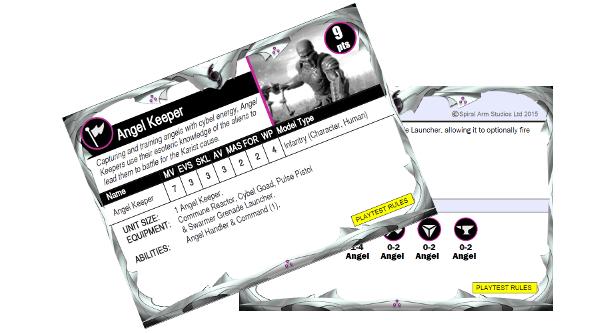
The PDF includes two cards: The Angel Keeper unit card, and a 'companion' card that includes new rules that apply to the Keeper. The rules on both of these cards are 'Playtest Rules', meaning that they're rules that are still being worked on, so you should ok it with your opponent before using the Angel Keeper in your games. Once the development process has been completed, the rules on the companion card will be rolled into the normal rulebooks and a final version of the unit card will be issued.
Obviously, the Keeper's force roster isn't yet as complete as it could be, because there are currently only the two angel kits - Minnows and the Mature Angel. Rest assured there will eventually be more unit options (and the associated model kits) to fill those other slots!
Building the Angel Keeper
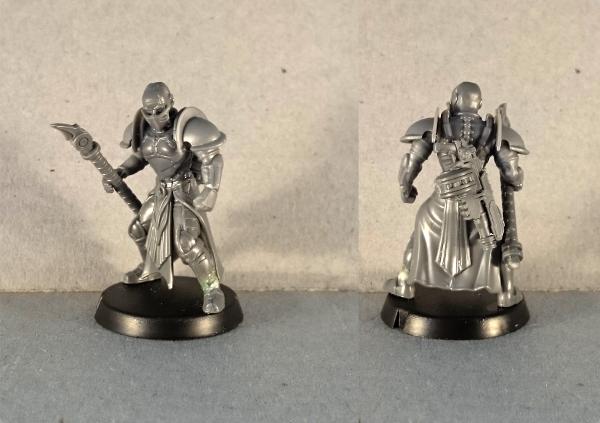
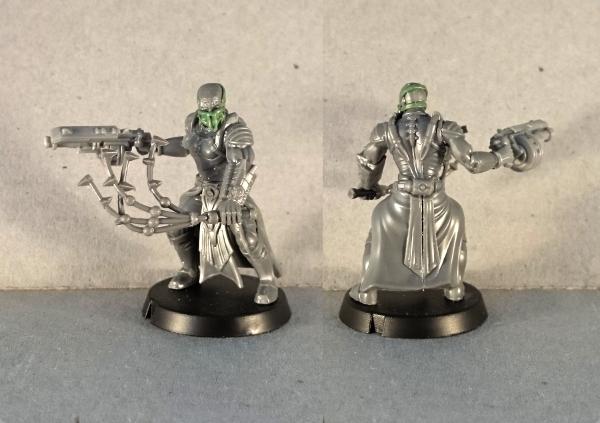
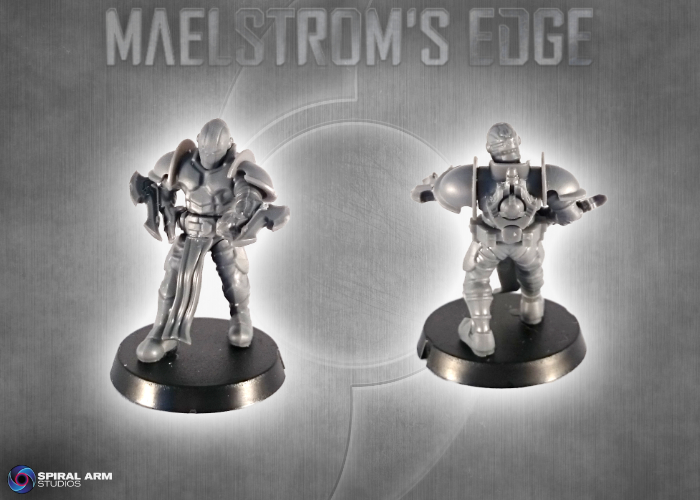
My initial idea for the Angel Keeper included a sculpted mask and a flail lifted from a Games Workshop kit. He looked the part, but the sculpting required was going to be a turn-off for some players, so I worked up a second incarnation that used only MEdge parts, which looks like this:
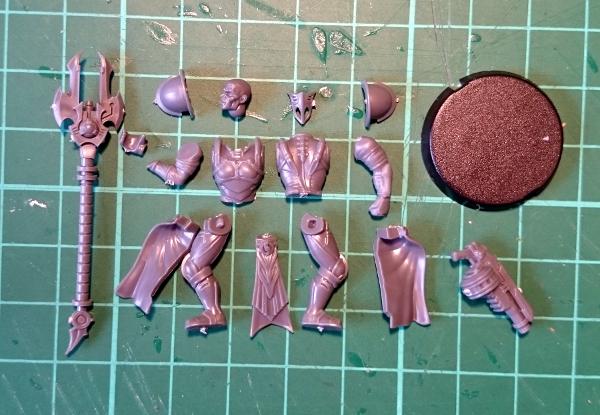
To build this version yourself, you'll need the following parts:
- A 25mm base
- Kaddar Nova legs and crown
- Shadow Walker Torso
- Karist Trooper arms and shoulder pads
- A bare head from the Kaddar Nova, Trooper or Expansion Sprue
- Ripper Grenade Launcher, Cybel Glaive and grabby hand* from the Expansion sprue
Assembly is mostly fairly straightforward: Build the legs as you normally would for the Kaddar Nova. You can create a slight visual break from the Nova by trimming off the bottom-most layer of the tabard, so it looks slightly less fancy than the Nova's if you like. Assemble and glue on the torso and the head.
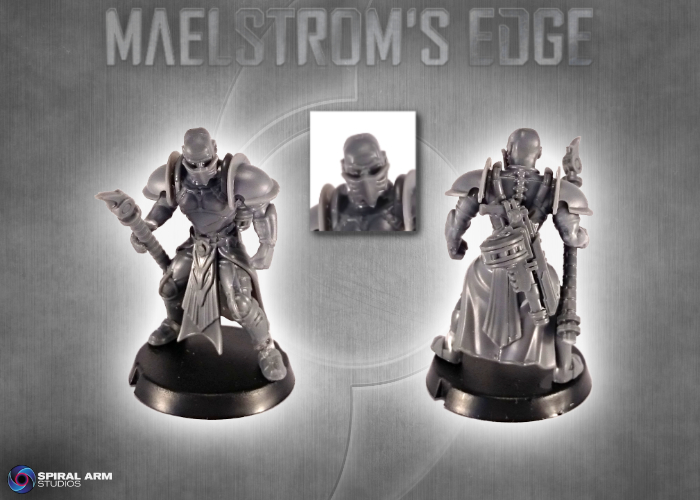
One of the main identifiers for the Angel Keeper is the mask that they wear, which aids them in communicating with their angels. This mask covers the keeper's lower face, and is made by taking the Kaddar Nova crown and trimming away its peak, as below:

This is then glued in place with the former peak pointing downwards over the Keeper's nose and mouth. To give it a slightly better fit, slice off the Keeper's nose and if you're using a Kaddar Nova head (which is slightly more gaunt than the Trooper heads) it can help to make the mask a little more curved - hold it upright between your thumb and forefinger and give it a gentle squeeze to bend it very slightly, and then glue it in place.
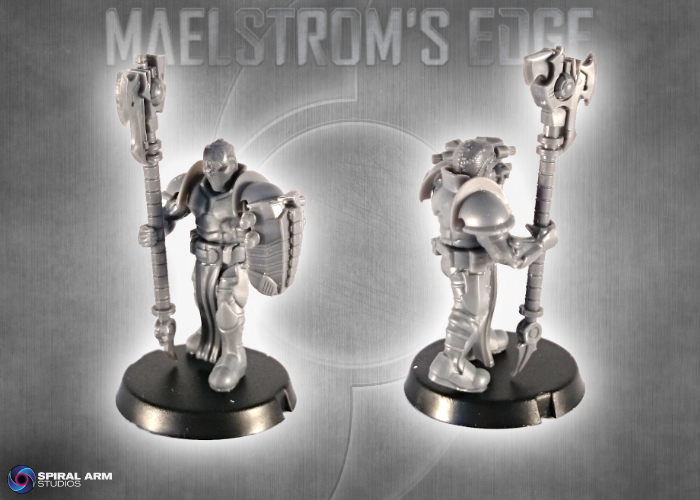
There is a small hollow in the small of the Nova's back, which is normally filled with the Nova's giant backpack. For the Angel Keeper, it's a handy place to glue the Ripper Grenade Launcher, hanging in reach on the Keeper's back for when it is needed and nicely disguising the hollow. If you're modeling your Keeper with the grenade launcher in hand, you can instead glue a grenade there, like on my first-generation keeper below:
The Angel Keeper is armed with a Cybel Goad, which he uses to encourage the angels in his charge to do as they're told, and also to whallop nearby enemies when the need arises. I envisaged the goad as potentially taking various forms depending on the preferences of the individual keeper - So some may use a staff or prod, others a whip or lash of some kind, or something else entirely. This opens up all sorts of modeling possibilities, but I'll show a couple of relatively easy options that I've come up with so far.
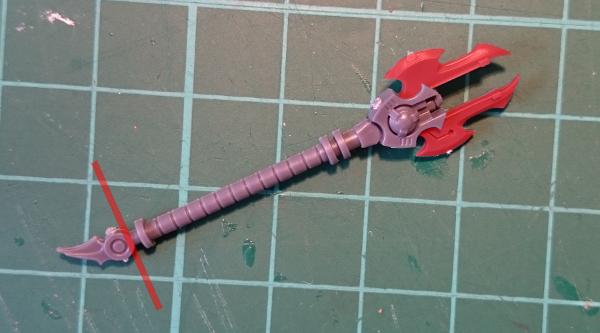
The easiest version of the goad uses just the shaft of the Cybel Glaive. Chop the head off just below the energy unit, along the red line shown below:

I picture this goad having a small cybel cannister in the round part behind the spike, which distributes a tiny jolt off cybel energy along the spike when it comes in contact with something.
Alternatively, you can trim the bottom spike and the blades off the glaive, as below:
This one is more of a taser-style unit, still requiring contact to use and administering a small cybel charge directly to the target rather than along a blade or spike.
Option number three is a little more complicated, using the handle from a Cybel Blade (from the Expansion sprue), the spike from the bottom of a Cybel Glaive and a short piece of metal guitar string to make a whip, as below:
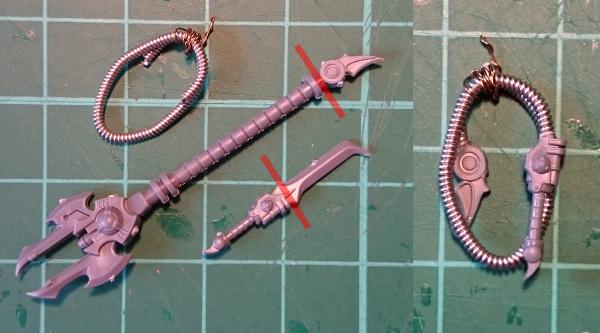
I have this one coiled up to hang on the Keeper's belt. The coiled guitar string is bound with a little fine copper wire to keep it together.
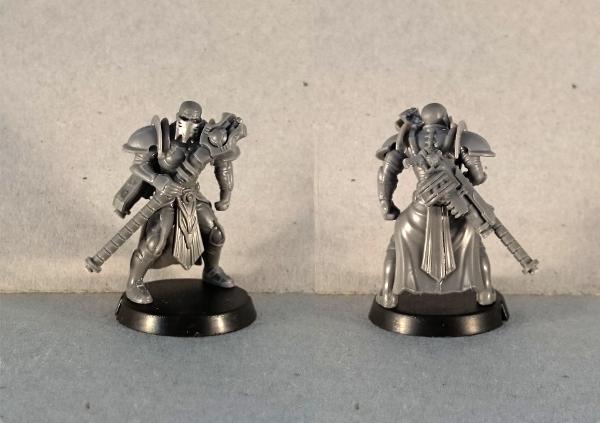
If you want your Keeper to have his grenade launcher in hand instead of his goad, the easiest option is to use the grenade launcher from the Trooper sprue instead of the Expansion sprue version, as it has the firing hand attached. For a single-handed grip, just slice or file off the support hand from the grenade launcher's stock. The pistol arm on the trooper sprue is nicely positioned out to the side for the grenade launcher - just cut off the pistol hand at the wrist, and glue the grenade launcher hand in its place.
For the Keeper below, I have also used Shadow Walker legs with an Expansion sprue loincloth, instead of the Nova legs. This is an easy way to give your Keeper a slightly more dynamic pose or to make him slightly less austentatious.
You can pick up the parts you need to build your own Angel Keeper from the Maelstrom's Edge online store (www.maelstromsedge.com - You'll need the Kaddar Nova, Shadow Walker, Karist Trooper and Faction Expansion Sprue, which will build you an Angel Keeper and because of all of the extras on the sprues will still leave enough spare parts to still build a Kaddar Nova, a Shadow Walker and a unit of Karist Troopers or Praetorians.
We would love to hear any feedback you have on the Angel Keeper's rules, and see how everyone is building their own keepers, so please share your creations, questions or comments on the Comm Guild Facebook page (https://www.facebook.com/groups/MaelstromsEdge)!
Tags: conversion karist keeper pdf
Community Spotlight: Panic's Doom Marines
Posted on Wednesday Oct 26, 2016 at 05:00pm in The Epirian Foundation
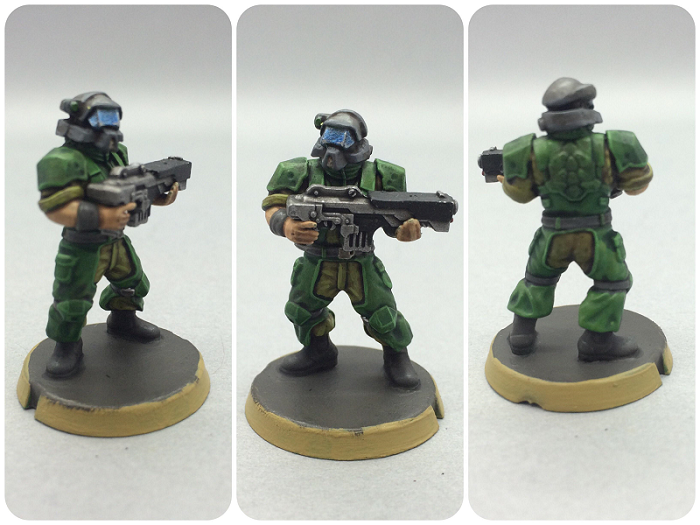
The flexibility of having a plastic model range is really shown with the ease of head-swaps that can be done. This excellent example by Panic is part of his Doom force, which is a valid Epirian army, themed around the classic first person shooter videogame 'Doom'. The right colourscheme and a simple head swap really changes the feel of the model. We'll be sharing a lot more of Panic's amazing work in the future!
The Comm Guild's community spotlight focuses on sharing something from the Maelstrom's Edge community each week, if you have anything you'd like to get in to the queue, please get in touch with us via the Maelstrom's Edge website
Tags: conversion doom epirian modeling painted
Spotlight: Karist Praetorians
Posted on Monday Sept 26, 2016 at 05:00pm in The Karist Enclave
- by Iain Wilson
The new Faction Expansion Sprue saw the addition of new units to the game for both the Karist and Epirian factions, with extra components to add to the original plastic kits. This seemed like a great chance to expore the versatility of these kits, by looking at different ways to build the new units.
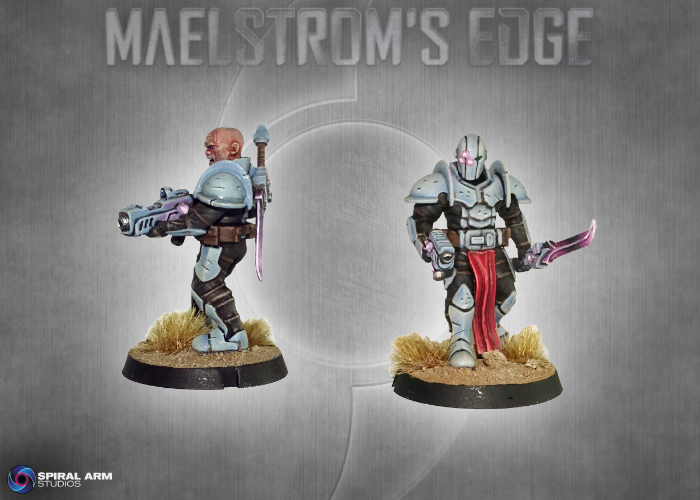
We've already had a look at the Epirian Suppression Team, so this time around I'm having a play with the Karist Praetorians. These veteran warriors are immediately recognisable with their massive Cybel Glaives, or the smaller but deadly Cybel Blade.
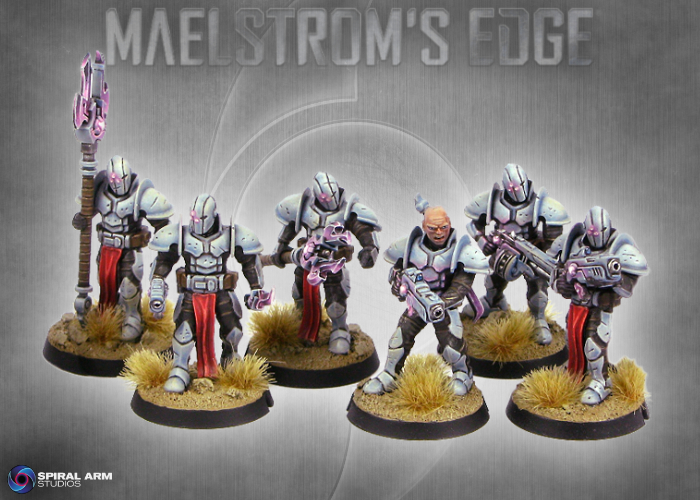
The sprue comes with an open hand for holding the Cybel Glaive in a single-handed grip. For the other arm, you can use the arm with clenched fist from the Karist trooper sprue, or the pointing arm from the Expansion sprue, as in the studio images above and below.
With a little cutting and gluing, though, you can use the rifle support hand from the Epirian Contractor sprue on one of the Karist left arms to create a two-handed grip like this:
The left hand will look slightly different to the right, as the Karists have a flat plate on the backs of their gloves which the Epirian hand will lack, but painted up like the other glove it won't be particularly noticable.
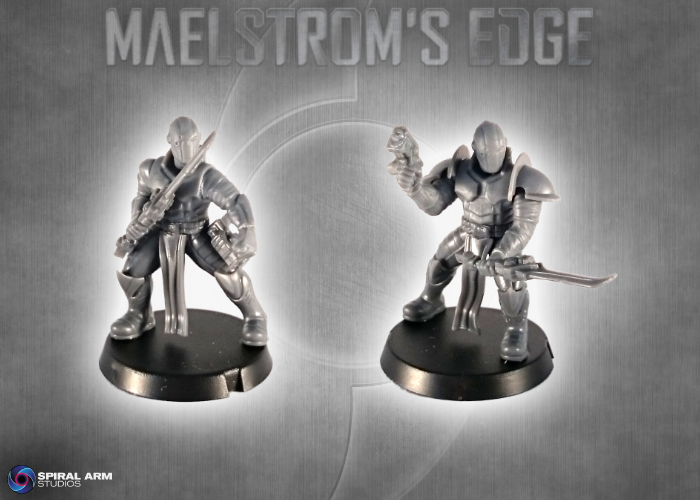
Both the Cybel Glaive and the Cyble Blade can be glued to the models' backs, to leave hands free for ranged weapons. For Cybel Blade-equipped models, you can instead use the clenched fists which can be found on the Karist Trooper sprue or the Expansion Sprue to hold the sword, by cutting the hand grip off the sword and gluing to the top of the fist, and gluing the bottom of the hand grip to the bottom of the fist. You need to trim off a little of the grip to correspond to the part that would be in the model's hand, otherwise you wind up with a very long handle. You may find it sits better if you sand or file down the top of the fist a little to make sure you have a flat surface to glue the sword onto.
You can achieve some slightly more dynamic posing and make your Praetorians stand out a little more from regular Troopers by using Shadow Walker legs, as below:
It's possible to equip a Praetorian with both a rifle (including a Ripper Grenade Launcher or Radwave Emitter) and a Cybel Blade. If you would like to avoid having to sling one of the weapons on the model's back, you can always combine them both into a single pole-arm:
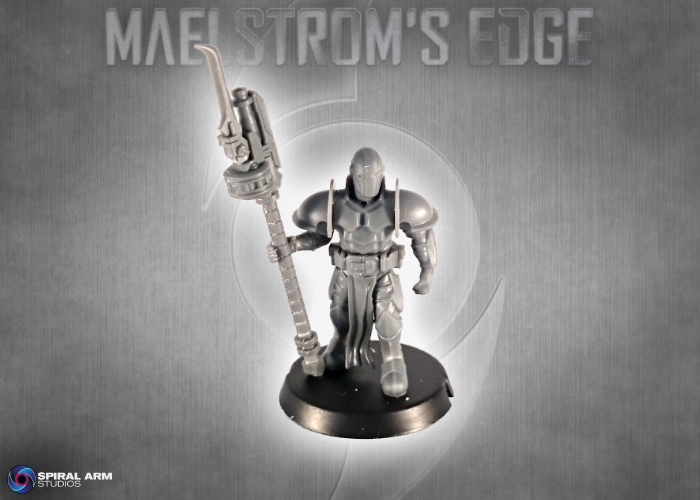
This was made by cutting away part of the fore-grip on the grenade launcher, trimming the handle off a Cybel Blade and gluing it in place. I then sliced off the back of the grenade launcher directly behind the drum magazine, and attached the shaft of a Cybel Glaive.
For an alternate take on the iconic Cybel Glaive, I tried going the other way and removing the shaft. The blades were attached to the model's forearms, and the power unit glued onto the model's back:
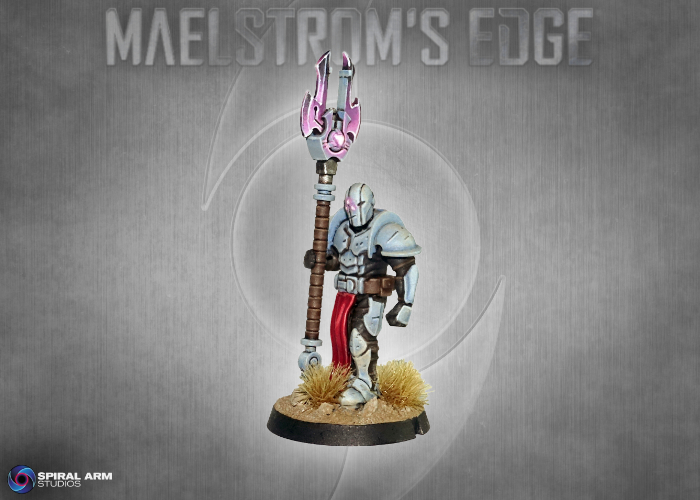
There are plenty of other possibilities for personalising your units from this sprue, or for creating new unit options for your own home-brew rules, like this model armed with a Cybel Halberd, made by flipping the Glaive's blade upside down, and Energy Shield taken from a Kaddar Nova's backpack:
...or this Angel Keeper, built from Kaddar Nova legs, a Shadow Walker torso, Karist Trooper arms and the shaft of a Cybel Glaive, with a mask made by trimming down a Kaddar Nova's crown.
(We'll be looking at Angel Keepers in a little more depth, and sharing a tutorial for building your own, in an upcoming article very soon...)
And finally, if overkill is your thing, here's a Kaddar Nova who clearly favours getting in close and personal with his enemies:

Why not have a try and see what you can come up with yourself? You can pick up the Faction Expansion Sprue in a handy 3-pack in the Maelstrom's Edge Online Store here.
You'll also need the Karist Trooper Sprue (here) for the standard Praetorian builds, or the Shadow Walker (here) or Kaddar Nova (here) sprues for the more adventurous conversions.
Feel free to share your creations on the Comm Guild Facebook page (https://www.facebook.com/groups/MaelstromsEdge) - We would love to see what you do with your Praetorian units!
Community Spotlight: Keltikhoa's Blog
Posted on Wednesday Sept 07, 2016 at 05:00pm in General
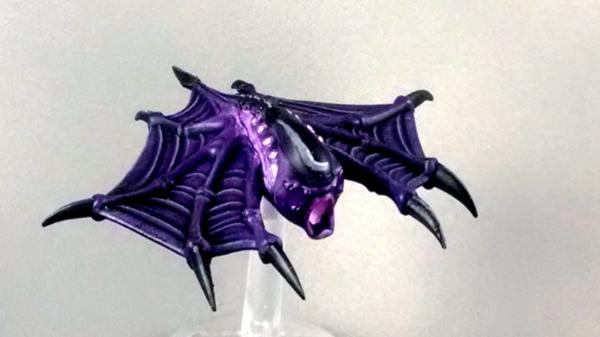
In today's community spotlight, we wanted to share the lovely work that Keltikhoa did on their project blog. From metallic Karists to this awesome Angel conversion:
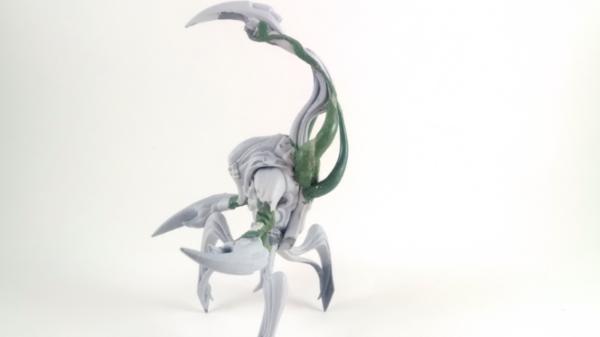
and in keeping with Monday's Minnow spotlight, here's their Angel Minnow colourscheme:
The Comm Guild's community spotlight focuses on sharing something from the Maelstrom's Edge community each week, if you have anything you'd like to get in to the queue, please get in touch with us via the Maelstrom's Edge website
Tags: angel conversion epirian karist spotlight
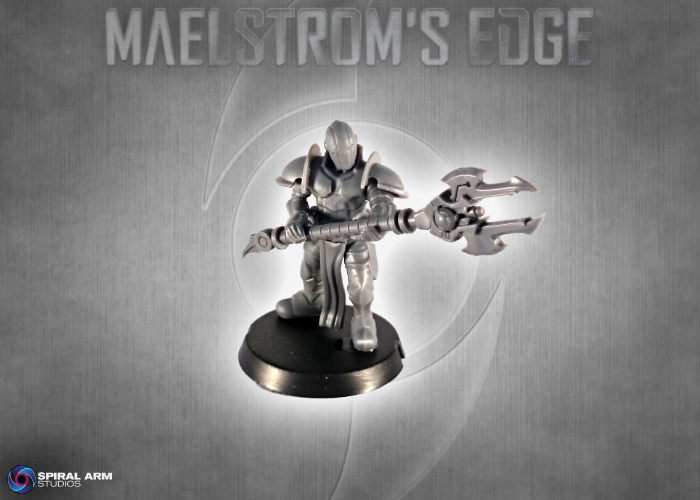
Forward Guidance - The Karist Angel Keeper
Posted on Sunday Aug 28, 2016 at 05:00pm in The Karist Enclave
Developing models in plastic is a very slow process with a lot of complicated factors involved. We start developing models about 24 months before they come out, and thought it might be interesting if we provide some early previews of stuff instead of sitting on it until the last minute! These previews are things we are actively working on, but you should assume a conservative time scale when we talk about them here!
One that is a pretty obvious model is the Karist Angel Keeper. It is no secret that we'd love to be able to field a force entirely made up of Angels, and the key to such a force would be a powerful HQ unit. A number of places in the fluff describe the Angel Keeper, including the audiobook "A Keeper's Duty" which is entirely about a trainee Keeper and their charges. This means that the model is fairly well defined, and currently undergoing artistic design.
Unusually, we've got the rules in a fairly good place even though it will still be quite a while until the model is out. This means you can try one out today by building your own, or proxying one with another model from your collection.
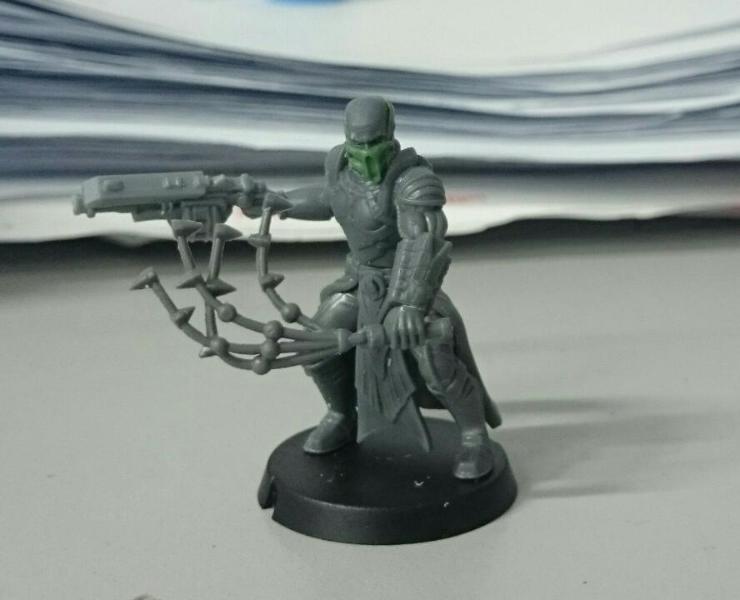
The awesome Insaniak on Dakka made his own Keeper conversion with a bunch of spare parts and bits box parts and it looks like this:
Here are the current target stats for the Angel Keeper from our master Rules overseer - yakface:
- Command unit. His detachment can include 1-4 Angel core units, 0-2 Angel hammer units (none of these exist yet), 0-2 Angel vanguard units (none of these exist yet) & 0-2 Angel anvil units.
- He would be somewhere in the realm of 8-9 points.
- His stats would be: MV7, EVS3, SKL3, AV3, MAS2, FOR2, WP4. Model type: Infantry (human, character).
- He'd be armed with some kind of CQ weapon (that you could imagine him using to punish the Angels when they're not behaving properly) and a Ripper Grenade Launcher that would fire Swarmer Grenade rounds. Might have to tone down the Swarmer Grenade rounds to only being 'psych 2D3' (instead of the normal 'psych 3D3')...although this could easily be justified by saying that the fired grenades are not quite as big and therefore don't carry as much na-cybel as the thrown version. He'd probably have the option to take traditional 'Ripper' rounds in the grenade launcher (to give him an actual gun that can deal damage if you want to pay the points for it).
- He'd have the 'Angel Handler' & 'Command (1)' abilities. His big other ability would be to remove the 'Kill Mission' ability from Minnow units within a certain range of him (probably the normal command range of 18"), thereby allowing those units to capture mission objectives (while they're close enough to him).
Finally, if you have one or more Angel Keeper in your force, you'd be able to swap out your standard faction objective for the 'First Contact' faction objective.
This faction objective would give all Angel units (units with at least 50% angel models) the 'Fearsome (1)' ability, or +1 to their Fearsome ability if they already have one. Any time a non-fearless enemy unit fails its activation discipline check while affected by the Fearsome ability of an Angel unit, you gain +1 VP. You can gain a maximum of 3 VPs this way, and once you have, the 'fearsome' ability bonus immediately ends.
If you have a go at using an Angel Keeper in your force, please let us know how you get on with it!
Tags: conversion karist preview rules